Check Clone Context logfile /u01/DEV8010/db/19.0.0/appsutil/clone/bin/CloneContext_0202132410.log for details.
[oradev@erpdevdb bin]$
=========================================
4.1.4 Configure the Database Technology Stack
IMPORTANT:Ensure oraInventory pointed in /etc/oraInst.loc must not contain the Same target PATH OR same Target Oracle Home Names, If exist then it is better deAttach those which may conflict with your Cloning session. ( Example : /u01/orainventory/ContentsXML/inventory.xml can be reviewed before proceeding)
CREATE RMAN DUPLICATE SCRIPT FOR RESTORING YOUR TARGET DATABASE:
SAMPLE COMMAND duplicate database to “<TARGET CDB>” backup location ‘<PATH OF RMAN BACKUP DIRECTORY>’;
DEV CREATION COMMAND duplicate database to “DEVCDB” backup location ‘/u01/DEV8010/RMAN_BKP_02FEB22_02AM’;
RMAN DUPLICATE SCRIPT:
cd /u01/DEV8010/
vi restoredevcdb.sql
INSERT Below duplicate script to clone the Production Backup to Restore to DEV CDB
run
{
allocate auxiliary channel a1 type disk;
allocate auxiliary channel a2 type disk;
allocate auxiliary channel a3 type disk;
duplicate database to “DEVCDB” backup location ‘/u01/DEV8010/RMAN_BKP_02FEB22_02AM’;
release channel a1;
release channel a2;
release channel a3;
}
This above script will restore the CDB + PDB Database plugged already in CDB
============================
STEP
======
[oradev@erpdevdb dbs]$ rman auxiliary /
Recovery Manager: Release 19.0.0.0.0 – Production on Wed Feb 2 19:02:18 2022
Version 19.12.0.0.0
Copyright (c) 1982, 2019, Oracle and/or its affiliates. All rights reserved.
connected to auxiliary database: DEVCDB (not mounted)
RMAN> @/u01/DEV8010/restoredevcdb.sql
RMAN>
============================
Take a new/fresh Putty Session Source Environment of this recently Restored Container Database DEVCDB
. /u01/DEV8010/db/19.0.0/DEVCDB_erpdevdb.env
Start the Container Database DEVCDB
Note: if the Database is already up then it is better to bounce the Database and ensure CDB has no issue shutting and starting up this newly Cloned DEVCDB.
Check the Datafiles, Controlfiles, Redolog Files and Temporary Tablespace files are correctly restored on the Target File System PATH
You should be able to connect to apps schema on this new ERPDEV PDB Connect using TOAD or xyz ToolVerify the UTL FILE directory is correctly populated : select * from apps.v$parameter2 where name=’utl_file_dir’
Since Our ORACLE_BASE is /u01/DEV8010 Therefore we ensured a temp folder inside ORACLE_BASE /u01/DEV8010/temp
Check Table FND_NODES ( If Source PDB records does not exist then skip the FND_CONC_CLONE.SETUP_CLEAN; )
EXEC FND_CONC_CLONE.SETUP_CLEAN;
COMMIT; EXIT;
cd /u01/DEV8010/db/19.0.0/appsutil/clone/bin perl adcfgclone.pl dbconfig /u01/DEV8010/db/19.0.0/appsutil/ERPDEV_erpdevdb.xml
X =============END OF DATABASE CLONING STEPS=============X
EBS 12.2.X – APPLICATION TIER CLONING:
3.2 Prepare the Source System Application Tier
Run Preclone on Source App Tier: cd $ADMIN_SCRIPTS_ADMIN perl adpreclone.pl appsTier Ensure completion is 100% Successful.
Now Take TAR backup of EBS Run File System
cd <backup PATH> tar -czf /backup_apps/EBS_BKPS/APPS_BKP_EBSapps`date +%d%m%y`.tgz $RUN_BASE/EBSapps
Transfer the tar file backup to Target EBS App Server and extract it ======================================
5.2 Configure the Target System Application Tier Nodes
IMPORTANT:Ensure oraInventory pointed in /etc/oraInst.loc must not contain the Same target PATH OR same Target Oracle Home Names, If exist then it is better deAttach those which may conflict with your Cloning session. ( Example : /u01/orainventory/ContentsXML/inventory.xml can be reviewed before proceeding) Start the Cloning process as below :
[appldev@erpdevapp bin]$ cd /u01/Ebiz_Dev8010/fs1/EBSapps/comn/clone/bin
[appldev@erpdevapp bin]$ pwd
/u01/Ebiz_Dev8010/fs1/EBSapps/comn/clone/bin
[appldev@erpdevapp bin]$ ls -lrt
total 296
-rwxrwxr-x. 1 appldev dba 5101 Nov 26 2012 adchkutl.sh
-rwxrwxr-x. 1 appldev dba 100123 Jan 15 04:03 adclone.pl
-rwxrwxr-x. 1 appldev dba 48314 Jan 15 04:03 adclonectx.pl
-rwxrwxr-x. 1 appldev dba 128221 Jan 15 04:03 adcfgclone.pl
-rwxrwxr-x. 1 appldev dba 10887 Jan 15 04:03 adaddnode.pl
Check Clone Context logfile /u01/Ebiz_Dev8010/fs1/EBSapps/comn/clone/bin/CloneContext_0116110816.log for details.
Running Rapid Clone with command:
============END OF CLONING PROCESS==============
POST CLONING ACTIONS:
1. Change sysadmin password ( Different from Production ) 2. Change apps password in EBS 12.2 requires below steps:After Finishing the Cloning Process Must change the apps password to differentiate it from Production
3.Run autoconfig with the newly changed password.
./autocfg.sh
Enter the APPS user password:
Start AdminServer using the $INST_TOP/admin/scripts/adadminsrvctl.sh script. Do not start any other application tier services.
$INST_TOP/admin/scripts/adadminsrvctl.sh start
Change the �apps� password in WLS Datasource as follows:Log in to WLS Administration Console.
b. Click Lock & Edit in Change Center.
c. In the Domain Structure tree, expand Services, then select Data Sources.
d. On the �Summary of JDBC Data Sources� page, select EBSDataSource.
e. On the �Settings for EBSDataSource� page, select the Connection Pool tab.
f. Enter the new password in the �Password� field.
g. Enter the new password in the �Confirm Password� field.
h. Click Save.
i. Click Activate Changes in Change Center.
http://srrco.server.com:7011/console
Username/Password <of weblogic>
Start all the application tier services using the below script
$INST_TOP/admin/scripts/adstrtal.sh
Verify the WLS Datastore changes as follows:Log in to WLS Administration Console.
b. In the Domain Structure tree, expand Services, then select Data Sources.
c. On the �Summary of JDBC Data Sources� page, select EBSDataSource.
d. On the �Settings for EBSDataSource� page, select Monitoring > Testing.
e. Select �oacore_server1�.
f. Click Test DataSource
g. Look for the message �Test of EBSDataSource on server oacore_server1 was succ
Executing screen command in Linux 8 gives error: bash: screen: command not found This is because: From Linux 8.x onwards screen has been deprecated and tmux has been introduced. Execute Un-Interrupted Red Hat Linux 8 Sessions (Remotely in the Background) using TMUX (Replacement of screen utility In Earlier Linux Versions)
In the life of an Oracle EBS Apps DBA / Database Administrator, especially when a DBA comes into a situation that he has to connect/ssh to the client’s ERP’s Database or Application Server in order to run or manage a long-running task on a remote Linux server (e.g., a cloud VM or a physical server).
Example: Particularly * Database Backup * Database optimization scripts or statistics collection jobs * Tar backup of the Oracle ERP File System. * Performing database migration from an old server to a new one. (The migration would indeed involve transferring large RMAN Backups which may be Long running/time-consuming)
These critical operations needs around couple of hours to finish gracefully or otherwise since we ‘re working over SSH, and we risk losing the session or the connection due to network issues, system shutdowns, or even just a lost Wi-Fi signal we would obviously risk interrupting the entire process and might have to restart the same job from the begining.
So in order to double ensure that we go through seemlessly we offcourse need to run uninterrupted at any cost !.
In this post I am sharing very basic usage of tmux as how tmux can help save our critical jobs keep running without any interruption:
This is a game-changer in environments where maintaining session continuity is crucial.
================
My Linux version is: 8.10
STEP 1: INSTALL TMUX RPM PACKAGE ON LINUX 8 [root@ebstest Packages]# pwd /media/rhel810-dvd/BaseOS/Packages [root@ebstest Packages]# yum -y install tmux-2.7-3.el8.x86_64.rpm Updating Subscription Management repositories. Unable to read consumer identity This system is not registered with an entitlement server. You can use subscription-manager to register. Last metadata expiration check: 1:42:01 ago on Wed 26 Mar 2025 08:28:53 AM +03. Dependencies resolved. Package Architecture Version Repository SizeInstalling: tmux x86_64 2.7-3.el8 @commandline 317 k Transaction Summary
Install 1 Package Total size: 317 k Installed size: 726 k Downloading Packages: Running transaction check Transaction check succeeded. Running transaction test Transaction test succeeded. Running transaction Preparing : 1/1 Installing : tmux-2.7-3.el8.x86_64 1/1 Running scriptlet: tmux-2.7-3.el8.x86_64 1/1 Verifying : tmux-2.7-3.el8.x86_64 1/1 Installed products updated. Installed: tmux-2.7-3.el8.x86_64 Complete! [root@ebstest Packages]#
=========================
We are going to start a session for our critical Database Backup Activity approximately requires around 3 hours of continuous and uninterrupted execution
STEP 2: START A NEW TMUX BACKGROUND SESSION
[appluat@ebstest ~]$ tmux new -s “database backup tmux seesion 1”
STEP 3: START TAR BACKUP OF DATA FILES IN TMUX BG SESSION
STEP 4 : TO TEMPORARY DISCONNECT FROM THIS TMUX SESSION WITHOUT STOPPING THE TAR BACKUP PROCESS AND KEEPING IT RUNNING Hit —> CTRL + B and then —> D ( without CTRL Key ) This will detach your session
OR
YOU MAY JUST DISCONNECT PUTTY TO SIMPLY SEE THE BENEFIT OF TMUX BACKGROUND SESSION
STEP 5 : CONNECT AGAIN TO YOUR SERVER AND CHECK EXISTING TMUX SESSIONS [orauat@ebstest ~]$ tmux ls database backup tmux seesion 1: 1 windows (created Wed Mar 26 12:06:24 2025) [88×14] [orauat@ebstest ~]$ database backup tmux seesion 1
The above listed session is the same that we created
STEP 6:NOW CONNECT/RESUME TO YOUR SAME DATABASE TMUX SESSION
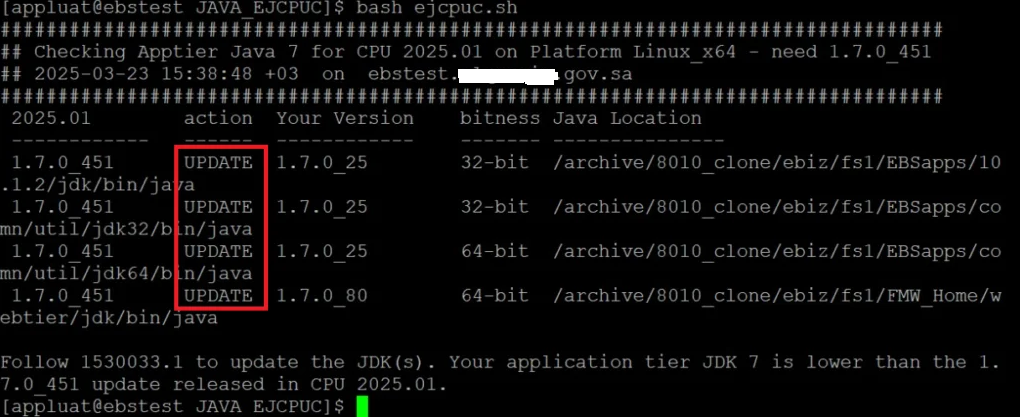
NOTE: JDK 7 has reached Sustaining Support at the end of July 2022. However with Oracle EBS only JDK 7 is certified and supported untill the time of posting this blog
To Upgrade JDK : Via Oracle Java checker utility EJCPUC.sh to check recommendation of latest certified JAVA to deploy on your Target EBS Application Node
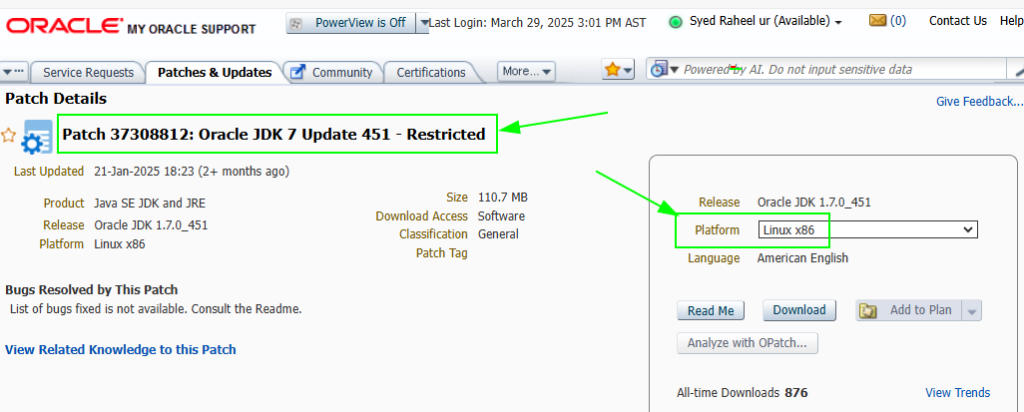
Download Latest certified java with EBS 12.2
Create Temporary Folder to upload Latest JDK on EBS App Server mkdir -p /archive/Upg_Stuff/JDK_451/
ls -lrt p37308812_170_451_Linux-x86-64.zip—-> 64 bit Java p37308812_170_451_LINUX.zip —-> 32 bit Java
Extract both zip files one by one : unzip p37308812_170_451_Linux-x86-64.zip unzip p37308812_170_451_LINUX.zip
-rw-r–r–. 1 appluat dba 65789345 Dec 18 17:38 jdk-7u451-linux-x64.tar.gz -rw-r–r–. 1 appluat dba 44697584 Dec 18 17:38 jdk-7u451-linux-x64.rpm -rw-r–r–. 1 appluat dba 69117035 Dec 18 17:38 jdk-7u451-linux-i586.tar.gz -rw-r–r–. 1 appluat dba 47324524 Dec 18 17:38 jdk-7u451-linux-i586.rpm
Remove rpm files or any other unwanted files that we do not plan to use : rm -rf jdk-7u451-linux-x64.rpm rm -rf jdk-7u451-linux-i586.rpm
[appluat@ebstest JDK_451]$ ls -lrt -rw-r–r–. 1 appluat dba 65789345 Dec 18 17:38 jdk-7u451-linux-x64.tar.gz -rw-r–r–. 1 appluat dba 69117035 Dec 18 17:38 jdk-7u451-linux-i586.tar.gz -rw-r–r–. 1 appluat dba 110099293 Mar 25 09:48 p37308812_170_451_Linux-x86-64.zip -rw-r–r–. 1 appluat dba 116029355 Mar 25 09:48 p37308812_170_451_LINUX.zip [appluat@ebstest JDK_451]$
Extract further the extrcated tgz delivered by the zip files: [appluat@ebstest JDK_451]$ tar -xzf jdk-7u451-linux-x64.tar.gz ( Extract 64 bit Java )
[appluat@ebstest JDK_451]$ ls -lrt drwxr-xr-x. 7 appluat dba 4096 Dec 4 10:15 jdk1.7.0_451 -rw-r–r–. 1 appluat dba 65789345 Dec 18 17:38 jdk-7u451-linux-x64.tar.gz -rw-r–r–. 1 appluat dba 69117035 Dec 18 17:38 jdk-7u451-linux-i586.tar.gz -rw-r–r–. 1 appluat dba 110099293 Mar 25 09:48 p37308812_170_451_Linux-x86-64.zip -rw-r–r–. 1 appluat dba 116029355 Mar 25 09:48 p37308812_170_451_LINUX.zip [appluat@ebstest JDK_451]$ [appluat@ebstest JDK_451]$ mv jdk1.7.0_451 jdk64 ( Rename to required name of folder ) [appluat@ebstest JDK_451]$ [appluat@ebstest JDK_451]$ ls -lrt total 442464 drwxr-xr-x. 7 appluat dba 4096 Dec 4 10:15 jdk64 -rw-r–r–. 1 appluat dba 65789345 Dec 18 17:38 jdk-7u451-linux-x64.tar.gz -rw-r–r–. 1 appluat dba 69117035 Dec 18 17:38 jdk-7u451-linux-i586.tar.gz -rw-r–r–. 1 appluat dba 110099293 Mar 25 09:48 p37308812_170_451_Linux-x86-64.zip -rw-r–r–. 1 appluat dba 116029355 Mar 25 09:48 p37308812_170_451_LINUX.zip [appluat@ebstest JDK_451]$
[appluat@ebstest JDK_451]$ tar -xzf jdk-7u451-linux-i586.tar.gz ( Extract 32 bit Java ) [appluat@ebstest JDK_451]$ ls -lrt total 442464 drwxr-xr-x. 7 appluat dba 4096 Dec 4 10:15 jdk64 drwxr-xr-x. 7 appluat dba 4096 Dec 4 10:20 jdk1.7.0_451 -rw-r–r–. 1 appluat dba 65789345 Dec 18 17:38 jdk-7u451-linux-x64.tar.gz -rw-r–r–. 1 appluat dba 44697584 Dec 18 17:38 jdk-7u451-linux-x64.rpm -rw-r–r–. 1 appluat dba 69117035 Dec 18 17:38 jdk-7u451-linux-i586.tar.gz -rw-r–r–. 1 appluat dba 47324524 Dec 18 17:38 jdk-7u451-linux-i586.rpm -rw-r–r–. 1 appluat dba 110099293 Mar 25 09:48 p37308812_170_451_Linux-x86-64.zip -rw-r–r–. 1 appluat dba 116029355 Mar 25 09:48 p37308812_170_451_LINUX.zip [appluat@ebstest JDK_451]$ [appluat@ebstest JDK_451]$ mv jdk1.7.0_451 jdk32 ( Rename to required name of folder ) [appluat@ebstest JDK_451]$ ls -lrt total 442460 drwxr-xr-x. 7 appluat dba 4096 Dec 4 10:15 jdk64 drwxr-xr-x. 7 appluat dba 4096 Dec 4 10:20 jdk32 -rw-r–r–. 1 appluat dba 65789345 Dec 18 17:38 jdk-7u451-linux-x64.tar.gz -rw-r–r–. 1 appluat dba 44697584 Dec 18 17:38 jdk-7u451-linux-x64.rpm -rw-r–r–. 1 appluat dba 69117035 Dec 18 17:38 jdk-7u451-linux-i586.tar.gz -rw-r–r–. 1 appluat dba 47324524 Dec 18 17:38 jdk-7u451-linux-i586.rpm -rw-r–r–. 1 appluat dba 110099293 Mar 25 09:48 p37308812_170_451_Linux-x86-64.zip -rw-r–r–. 1 appluat dba 116029355 Mar 25 09:48 p37308812_170_451_LINUX.zip [appluat@ebstest JDK_451]$
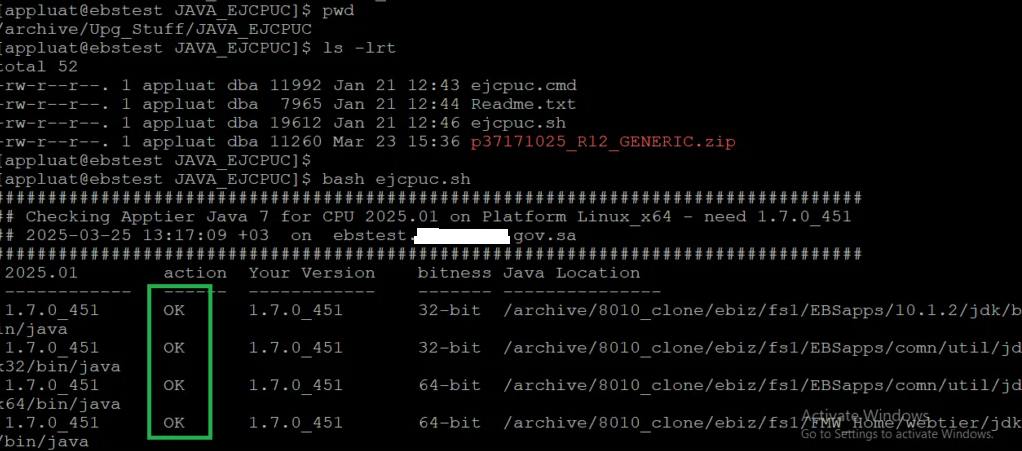
Navigate to COMMON_TOP/util JDK 64 and 32 both should be here
cd /archive/8010_clone/ebiz/fs1/EBSapps/comn/util rename the both the existing 32 and 64 bit JDK folders
[orauat@ebsdbuat bin]$ perl txkCfgUtlfileDir.pl -contextfile=/do2/8010_uat_db/db/19.0.0/appsutil/PREUPG_ebsdbuat.xml -oraclehome=/do2/8010_uat_db/db/19.0.0 -outdir=/do2/8010_uat_db/db/19.0.0/appsutil/log -mode=getUtlFileDir Enter the APPS Password: Script Name : txkCfgUtlfileDir.pl Script Version : 120.0.12020000.15 Started : Wed Feb 7 07:47:03 +03 2024 Log File : /do2/8010_uat_db/db/19.0.0/appsutil/log/TXK_UTIL_DIR_Wed_Feb_7_07_46_58_2024/txkCfgUtlfileDir.log Context file: /do2/8010_uat_db/db/19.0.0/appsutil/PREUPG_ebsdbuat.xml exists. Completed : Wed Feb 7 07:47:05 +03 2024 ERROR DESCRIPTION: (FATAL ERROR PROGRAM : (txkCfgUtlfileDir.pl) TIME : Wed Feb 7 07:47:04 2024 FUNCTION: main::validateAppsSchemaCredentials [ Level 1 ] ERRORMSG: Invalid APPS database user credentials. ) ERRORCODE = 1 ERRORCODE_END
[orauat@ebsdbuat bin]$ exit logout [orauat@ebsdbuat dbs]$ [orauat@ebsdbuat dbs]$ lsnrctl status PRECDB LSNRCTL for Linux: Version 19.0.0.0.0 – Production on 07-FEB-2024 07:47:30 Copyright (c) 1991, 2022, Oracle. All rights reserved. Connecting to (DESCRIPTION=(ADDRESS=(PROTOCOL=TCP)(HOST=ebsdbuat.srrco.org.sa)(PORT=1526)))
STATUS of the LISTENER
Alias PRECDB Version TNSLSNR for Linux: Version 19.0.0.0.0 – Production Start Date 06-FEB-2024 21:36:41 Uptime 0 days 10 hr. 10 min. 48 sec Trace Level off Security ON: Local OS Authentication SNMP OFF Listener Parameter File /do2/8010_uat_db/db/19.0.0/network/admin/listener.ora Listener Log File /do2/8010_uat_db/db/19.0.0/log/diag/tnslsnr/ebsdbuat/precdb/alert/log.xml Listening Endpoints Summary… (DESCRIPTION=(ADDRESS=(PROTOCOL=tcp)(HOST=ebsdbuat.srrco.org.sa)(PORT=1526))) The listener supports no services The command completed successfully
[orauat@ebsdbuat dbs]$ ps -ef | grep tns root 68 2 0 Feb06 ? 00:00:00 [netns] orauat 96275 1 0 Feb06 ? 00:00:00 /do2/8010_uat_db/db/19.0.0/bin/tnslsnr PRECDB -inherit orauat 116407 115254 0 07:49 pts/1 00:00:00 grep –color=auto tns [orauat@ebsdbuat dbs]$ [orauat@ebsdbuat dbs]$ [orauat@ebsdbuat dbs]$ cd /do2/8010_uat_db/db/19.0.0/appsutil/scripts/PREUPG_ebsdbuat/ [orauat@ebsdbuat PREUPG_ebsdbuat]$ ./adcdblnctl.sh start PRECDB Logfile: /do2/8010_uat_db/db/19.0.0/appsutil/log/PREUPG_ebsdbuat/adcdblnctl.txt You are running adcdblnctl.sh version 120.0.12020000.4 Starting listener process PRECDB … Listener PRECDB has already been started. Waiting for service PREUPG to be available… Waiting for service PREUPG to be available… Waiting for service PREUPG to be available…
CAUSE: local_listener was not correct
SOLUTION: alter system set local_listener=’hostname.domain:dbport’ scope=both;
ORA-28000, the account was unlocked in the primary database, but still locked in the Active Standby Database.
Situation:
The primary database is configured with Dataguard is returning an error ORA-28000, “the account is locked,” when the user tries to log in.
The database administrator unlocked this user’s account in the primary database but still the user is unable to connect to the standby and receives the same error code, ORA-28000, for that specific user; nonetheless, the standby account status indicates that it is open.
Standby Situation:
SYS@DATABASE > conn raheel/raheel123
ERROR:
ORA-28000: the account is locked
Warning: You are no longer connected to ORACLE.
SYS@DATABASE > select username,account_status from dba_users where username=’RAHEEL’;
USERNAME ACCOUNT_STATUS
——————————————————————————————
Raheel OPEN
SYS@DATABASE > @check_db
DbId Name Log Mode Open Mode Database Role Created Resetlogs Remote Archive
603299473 RAHEEL ARCHIVELOG READ ONLY WITH APPLY PHYSICAL STANDBY 11/13/2019 20:16:17 11/13/2019 03:54:21 ENABLED
SOLUTION: This is a result of the standby’s read-only access and inability to change any tables. A user’s account is only locked in memory on the standby database when it has to be.
The database administrator, sysdba, is a privileged user who needs to log in to the standby and unlock the account. The account is now unlocked in the standby database, as confirmed by the message ORA-28015 “Account unlocked, but the database is open for read-only access.” After that, there are no more errors for the user to encounter when logging into the standby database.
Connect Standby Database and unlock the account:
SYS@DATABASE > ALTER USER RAHEEL ACCOUNT UNLOCK;
ALTER USER RAHEEL ACCOUNT UNLOCK;
ERROR at line 1:
ORA-28015: Account unlocked, but the database is open for read-only access
Verify whether your Primary Oracle Database is in sync with the Standby Database in a Data Guard configuration.
Solution:
To ensure synchronization, you need to check the Managed Recovery Process (MRP) and query relevant views that provide real-time status and logs. Below are the key SQL queries that help you confirm synchronization.
1. Check the Managed Standby Recovery Process (MRP)
Run the following query to check the status of the MRP process on the standby database:
SELECT thread#, sequence#, process, client_process, status, blocks
FROM v$managed_standby;
THREAD# – Identifies the thread number.
SEQUENCE# – Displays the current sequence number being processed.
PROCESS – Indicates the type of process running.
CLIENT_PROCESS – Shows the client process (e.g., ARCH for archive or MRP for managed recovery).
STATUS – Current status of the process (e.g., ACTIVE or WAITING).
BLOCKS – Number of blocks being processed.
2. Check for Errors in Data Guard Status
Run this query to look for any critical errors (severity: Error or Fatal) in the Data Guard status log:
SELECT gvi.thread#, timestamp, message
FROM gv$dataguard_status gvds, gv$instance gvi
WHERE gvds.inst_id = gvi.inst_id
AND severity IN ('Error', 'Fatal')
ORDER BY timestamp, thread#;
This query will help you identify potential issues that could disrupt synchronization between the primary and standby databases.
3. Compare Last Received and Applied Archive Logs
Use this query to compare the last archive log received and applied on the standby:
SELECT ARCH.THREAD# "Thread",
       ARCH.SEQUENCE# "Last Sequence Received",
       APPL.SEQUENCE# "Last Sequence Applied",
       (ARCH.SEQUENCE# - APPL.SEQUENCE#) "Difference"
FROM (SELECT THREAD#, SEQUENCE#
      FROM V$ARCHIVED_LOG
      WHERE (THREAD#, FIRST_TIME) IN
            (SELECT THREAD#, MAX(FIRST_TIME)
             FROM V$ARCHIVED_LOG
             GROUP BY THREAD#)) ARCH,
     (SELECT THREAD#, SEQUENCE#
      FROM V$LOG_HISTORY
      WHERE (THREAD#, FIRST_TIME) IN
            (SELECT THREAD#, MAX(FIRST_TIME)
             FROM V$LOG_HISTORY
             GROUP BY THREAD#)) APPL
WHERE ARCH.THREAD# = APPL.THREAD#;
Last Sequence Received – The most recent archive log received by the standby.
Last Sequence Applied – The most recent archive log applied on the standby.
Difference – Shows the gap (if any) between the received and applied sequence numbers.
If the Difference is 0 (zero), your standby database is fully synchronized with the primary. Any positive value indicates lag that may require attention.
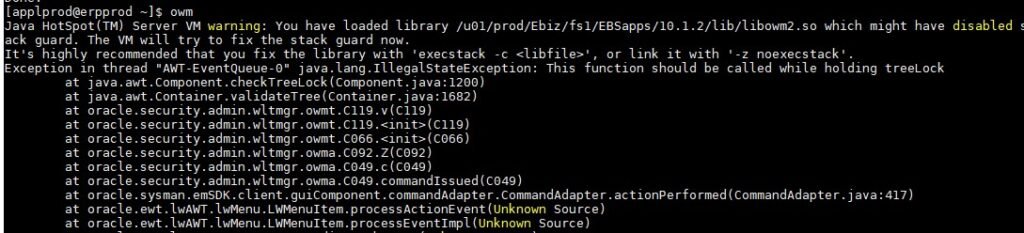
I had to renew my customer’s EBS SSL certificate as it was about to expire soon Since the EBS 12.2.7 wallet had the ability to open wallet in GUI mode , I tried to open wallet BUT was Not able to open it facing the below error.
! The new version of wallet I guess does not allow to perform this activity through OWM GUI.
owm &
Java HotSpot(TM) Server VM warning: You have loaded library /oracle/PROD/fs1/EBSapps/10.1.2/lib/libowm2.so which might have disabled stack guard. The VM will try to fix the stack guard now. It’s highly recommended that you fix the library with ‘execstack -c ‘, or link it with ‘-z noexecstack’.
SOLUTION:
In order to resolve the issue, do the following: export PATH=$FMW_HOME/webtier/bin:$FMW_HOME/oracle_common/bin:$PATH
Run:
owm &
it works now.
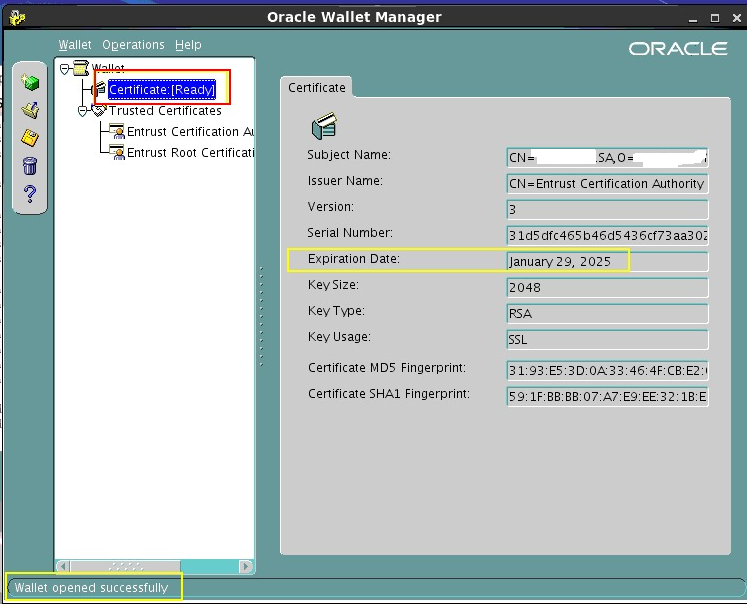
Removed the expired certificates
Imported all fresh Trusted and User Certififcates.
Command to displayed the wallet to validate the certificate chain: $FMW_HOME/oracle_common/bin/orapki wallet display -wallet .
[applprod@erpprod Apache]$ $FMW_HOME/oracle_common/bin/orapki wallet display -wallet . Oracle PKI Tool : Version 11.1.1.9.0 Copyright (c) 2004, 2015, Oracle and/or its affiliates. All rights reserved.
Requested Certificates: User Certificates: Subject: CN=*****.gov.sa,O=****** ***,L=Riyadh,C=SA Trusted Certificates: Subject: CN=SSL.com TLS RSA Root CA 2022,O=SSL Corporation,C=US Subject: CN=Entrust OV TLS Issuing RSA CA 1,O=SSL Corporation,C=US Subject: CN=SSL.com EV Root Certification Authority RSA R2,O=SSL Corporation,L=Houst on,ST=Texas,C=US [applprod@erpprod Apache]$
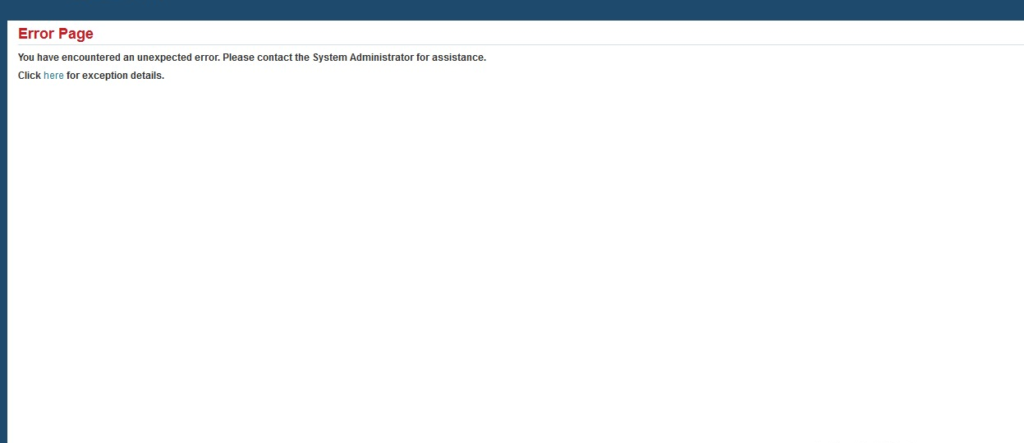
When we click on the home button on landing page after login on java applet we are facing this issue. ” You have encountered an unexpected error. Please contact the system administrator for assistance. “
when we click on ” click here for exception details “
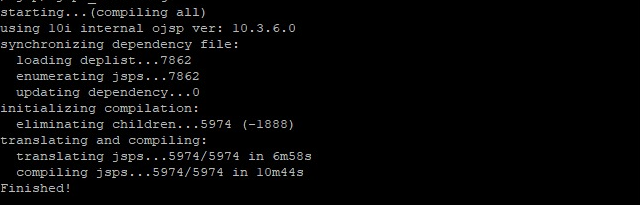
SOLUTION: Compile jsps
If you are login to EBS, do a clean logout.
Stop the application.
After complete stop of application check the following processes to confirm that the application is completely stopped. ps -ef | grep PALIB ps -ef | grep FND ps -ef | grep OPP ps -ef | grep frmweb


 Visit Today : 35
 Visit Yesterday : 36
 This Month : 694
 This Year : 1914
 Total Visit : 9310
 Hits Today : 44
 Total Hits : 12285
 Who's Online : 1