If you are working with Oracle E-Business Suite and need to test whether the Workflow Notification Mailer is configured correctly, sending a test notification to a specific user is the best way to verify it. This guide will walk you through the complete step-by-step process.
Step-by-Step Guide to Send Test Workflow Email
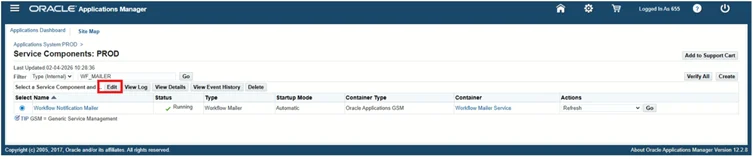
1. Go to site map
2. click on notification mailer
3. click on edit
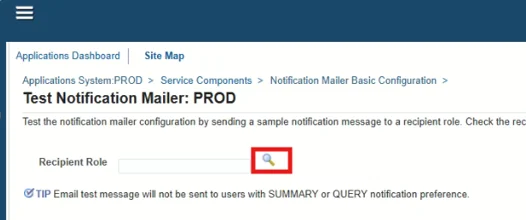
4. click on test mailer
5. click on search button
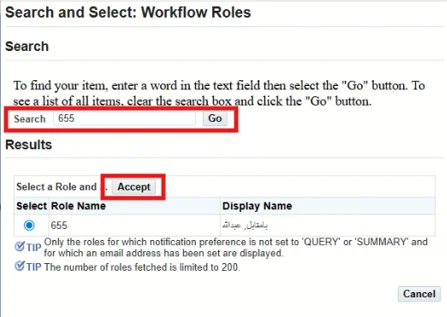
6. search your username
7. click on send message
8. click on ok.
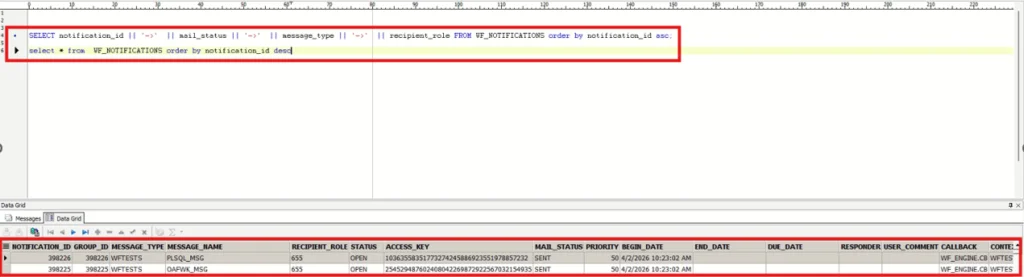
9. Now open toad and run this query: select * from WF_NOTIFICATIONS order by notification_id desc
The mail_status will be mail for some time and then it changes to sent which means that it has been sent to the respective user.
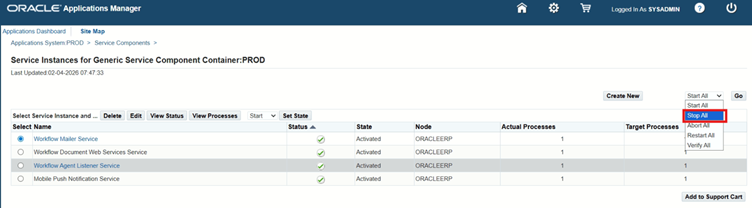
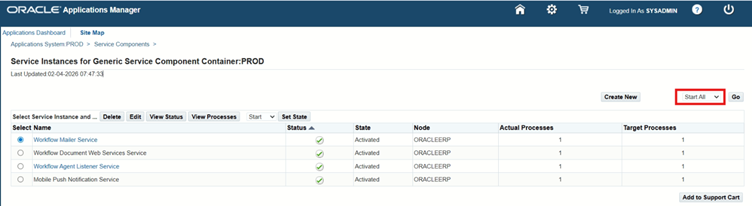
In this blog we are going to discuss how we can restart the service of workflow email
1. Go to site map 2. Click notification mailer 3. Select Workflow Mailer Service 4. Open LOV and click on stop all 5. Click ok 6. Now reload browser until the status set to deactivated 7. Now click on start all
During configuration of a DR server, when i try to do telnet from primary to dr, the telnet utility is not working on primary, so this is the procedure to install telnet.
ERROR: telnet “IP” 1572 bash: telnet: command not found… Install package ‘telnet’ to provide command ‘telnet’? [N/y] y
Waiting in queue… The following packages have to be installed: telnet-1:0.17-76.el8.x86_64 The client program for the Telnet remote login protocol Proceed with changes? [N/y] y
Waiting in queue…
Waiting for authentication… Failed to install packages: Failed to obtain authentication.
there were also some network restriction because of which the primary and DR were not communicating for which I had to ask the Linux engineer to allow those restriction. You can check that too.
RESULT: telnet “IP” 1572 Trying “IP”… Connected to “IP”. Escape character is ‘^]’.
Learn step-by-step how to replace a corrupted or problematic undo tablespace in Oracle Database, including creating a new undo tablespace and updating the spfile safely
Undo tablespaces are critical in Oracle Database for managing transactions and rollback segments. Occasionally, an undo tablespace may become corrupted, offline, or unusable, causing transaction failures. This blog guides you through safely replacing a corrupted undo tablespace in Oracle 11g/12c/19c using SQL*Plus, ensuring minimal downtime and risk.
Create a PFILE from the Existing SPFILE
Creating a PFILE allows you to make temporary parameter changes without affecting the current SPFILE:
SQL> CREATE PFILE='/u01/MiscFiles/initTempJCDB1.ora' FROM SPFILE;
Shutdown the Database
Shut down the database instance to make changes:
SQL> SHUTDOWN IMMEDIATE;
Update PFILE Parameters
Edit the PFILE (initTempJCDB1.ora) to include:
*.undo_management = manual
*.event='10513 trace name context forever, level 2'
These settings ensure manual undo management and detailed tracing during recovery.
Startup in Restricted Mode Using PFILE
Start the database in restricted mode with the edited PFILE:
SQL> CREATE PFILE='/u01/MiscFiles/initTempJCDB122.ora' FROM SPFILE;
Verify Undo Segments Status
Check all undo segments to ensure they are offline:
SQL> SELECT tablespace_name, status, segment_name
     FROM dba_rollback_segs
     WHERE status != 'OFFLINE';
⚠ Critical: If any undo segment shows PARTLY AVAILABLE or NEEDS RECOVERY, contact Oracle Support before proceeding.
IF ALL OFFILINE ONLY THEN CONTINUE TO THE NEXT STEP
Create a New Undo Tablespace
Create a new undo tablespace to replace the corrupted one:
SQL> CREATE UNDO TABLESPACE UNDOTBS11
     DATAFILE '+DATA/jcdb/datafile/undotbs12.262.7685046592'
     SIZE 2048M AUTOEXTEND ON NEXT 120M MAXSIZE UNLIMITED;
Drop the Old Undo Tablespace
Once the new undo tablespace is created and verified, drop the old one:
SQL> DROP TABLESPACE UNDOTBS1 INCLUDING CONTENTS AND DATAFILES;
Shutdown and Startup Database
Shutdown the database:
SQL> SHUTDOWN IMMEDIATE;
Startup Using Original SPFILE
Startup the database in NOMOUNT mode if needed:
SQL> STARTUP NOMOUNT;
Update SPFILE with New Undo Tablespace
Set the new undo tablespace in the SPFILE:
SQL> ALTER SYSTEM SET undo_tablespace=UNDOTBS11 SCOPE=BOTH SID='JCDB1';
Step 11: Restart the Database
Shutdown and start the database normally using the updated SPFILE:
SQL> SHUTDOWN IMMEDIATE;
SQL> STARTUP;
Conclusion
Replacing a corrupted undo tablespace involves carefully creating a new tablespace, updating the SPFILE, and ensuring all undo segments are offline. Following these steps helps maintain database integrity and ensures smooth operations without downtime.
While running EBS 12.2 rapid cloning perl adcfgclone appsTier on target machine getting error Waiting for the AdminServer to start, Connection to AdminServer failed, AdminServer start failed, Make sure that AdminServer parameters specified in the move plan are correct.
ISSUE
Error 1:
FINEST : Jun 24, 2025 12:10:52 – [ServerStartUtility:checkAdminServerStartup] Unable to get non ssl MBean connection. Admin server might not be up. Error message is null FINE : Jun 24, 2025 12:10:52 – [ServerStartUtility:startAdminServer] Starting of Admin server AdminServer is in progress …, 14 minutes passed. FINE : Jun 24, 2025 12:10:52 – [ServerStartUtility:startAdminServer] Waiting for the AdminServer to start … FINE : Jun 24, 2025 12:10:57 – [ServerStartUtility:checkAdminServerStartup] Checking server startup for the url -t3://dev..gov.sa:7001 FINEST : Jun 24, 2025 12:10:58 – [ServerStartUtility:checkAdminServerStartup] Unable to get non ssl MBean connection. Admin server might not be up. Error message is null FINE : Jun 24, 2025 12:10:58 – [ServerStartUtility:startAdminServer] Waiting for the AdminServer to start … FINE : Jun 24, 2025 12:11:03 – [ServerStartUtility:checkAdminServerStartup] Checking server startup for the url -t3://dev..gov.sa:7001
Error 2:
Error Message :1 Jun 24, 2025 19:30:03 – ERROR – CLONE-20362 Connection to AdminServer failed. Jun 24, 2025 19:30:03 – CAUSE – CLONE-20362 AdminServer start failed. Make sure that AdminServer parameters specified in the move plan are correct. Jun 24, 2025 19:30:03 – ACTION – CLONE-20362 Check the AdminServer logs. Error Message :2 Jun 24, 2025 19:30:03 – SEVERE – CLONE-20937 “pasteConfig” operation of J2EE domain failed. Check clone log and error files for more details. Error Message :3 Jun 24, 2025 19:30:03 – ERROR – CLONE-20237 Restoring the sourceid “J2EECOMPONENT@EBS_domain” has failed. Jun 24, 2025 19:30:03 – CAUSE – CLONE-20237 An internal operation failed. Jun 24, 2025 19:30:03 – ACTION – CLONE-20237 Check the clone log for more details.
CAUSE:
Low s_adminservertimeout value caused premature timeouts during configuration, leading to incomplete domain setup.
Corrupted or outdated WebLogic domain due to misaligned configuration with context file and AutoConfig templates.
SOLUTION: Oracle Referece: Recreate the Oracle E-Business Suite (EBS) WLS (Weblogic Server) Domain
In the Database Tier do the following: 1.1. Log into the database tier. 1.2. Source the environment. 1.3. Ensure that database and listener are up and running.
In the Applications Tier do the following:
2.1. Source the RUN file system environment. 2.2. Stop all middle tier services using $ADMIN_SCRIPTS_HOME/adstpall.sh. 2.3. Ensure that no process is running from RUN file system. 2.4. Take a backup of the context file and Update s_adminservertimeout context variable value to 4000 and run AutoConfig. 2.5. Execute below command: $ $FND_TOP/bin/txkrun.pl -script=ChkEBSDependecies -server=ALL_SERVERS 2.6. Recreate the domain by following below steps: $ cd $FND_TOP/patch/115/bin $ perl txkEBSDomainConfig.pl 2.7. Start the services and check the WLS domain is fine. For example, you might want to start the WLS console and check all the expected managed servers are up and running.
Note: when running txkEBSDomainConfig.pl you will be prompted “Enter the server start mode for the domain [DEFAULT – prod]:”.Choose the default value of prod.
Oracle Web Logic Server can be run in two different modes, either prod or dev, and the recommended option is to choose prod as it is safer.
The dev mode allows to deploy unsigned java classes but is quicker than prod.*
While working with Oracle E-Business Suite 19c, generating CDB TNS Admin entries using the txkGenCDBTnsAdmin.pl script may fail on Linux with the following error:
Can’t locate TXK/ARGS.pm in @INC (you may need to install the TXK::ARGS module)
This blog explains the cause and a simple solution to make the script run successfully.
Issue
run the following commands:
cd /u01/8051/db/19.3.0/appsutil source ./txkSetCfgCDB.env -dboraclehome=/u01/8051/db/19.3.0
Can’t locate TXK/ARGS.pm in @INC (you may need to install the TXK::ARGS module) (@INC contains: /u01/8051/db/19.3.0/perl/lib/site_perl/5.28.1/x86_64-linux-thread-multi /u01/8051/db/19.3.0/perl/lib/site_perl/5.28.1 /u01/8051/db/19.3.0/perl/lib/5.28.1/x86_64-linux-thread-multi /u01/8051/db/19.3.0/perl/lib/5.28.1) at txkGenCDBTnsAdmin.pl line 72. BEGIN failed–compilation aborted at txkGenCDBTnsAdmin.pl line 72.
Solution
Start a Fresh Session
Open a new terminal session
Log in as the db user
Set Environment Cleanly
cd /u01/8051/db/19.3.0/appsutil source ./txkSetCfgCDB.env -dboraclehome=/u01/8051/db/19.3.0
While performing an Oracle EBS 12.2 appsTier clone on Linux 8, you may encounter a failure if your preclone backup is sourced from Linux 7.
“Failed to execute FMW pre-requisite check“
This happens in upgrade or migration scenarios where environments are being moved from older OS versions to modern platforms like Linux 8.
In this blog, we will cover:
The exact error
Root cause
Quick workaround (target-side fix)
Permanent solution (production fix)
Issue
Command:
perl adcfgclone.pl appsTier
Fails with the following error:
Failed to execute FMW pre-requisite check: FMW Pre-requisite check log file location : /u01/8045_Iteration/ebiz/fs1/EBSapps/comn/clone/FMW/logs/prereqcheck.log The entry point is: oracle.installType.all Check Name:CertifiedVersions Check Description:This is a prerequisite condition to test whether the Oracle software is certified on the current O/S or not. /etc/inittab does not seem to contain default runlevel information. Expected result: One of oracle-7,redhat-7,redhat-6,oracle-6,oracle-5,enterprise-5.4,enterprise-4,enterprise-5,redhat-5.4,redhat-4,redhat-5,SuSE-10,SuSE-11 Actual Result: oracle-8.10 Check complete. The overall result of this check is: Failed <<<<
Root Cause
The issue occurs because: Outdated prereq framework does not support Linux 8
Workaround (Quick Fix on Target Server)
You can fix this issue directly on the target Linux 8 clone server.
Update prereq folder which basically resides under /u01/8045_Iteration/ebiz/fs1/EBSapps which is extracted from Tar Backup.
Below is the target directory /u01/8045_Iteration/ebiz/fs1/EBSapps/comn/clone/prereq/webtier/Scripts/prereq/linux64
Unzip the patch zip file into the PATCH_TOP cd /u01/8045_Iteration unzip p33471111_111190_Generic.zip This will deliver prereq folder with updated linux 8 supported piece of code
cd /u01/8045_Iteration/ebiz/fs1/FMW_Home/webtier/inventory/Scripts mv prereq OFF_TILL_LINUX_7_prereq cp -r /u01/8045_Iteration/prereq .
Verify Updated OS Support
Ensure the new prereq contains Linux 8 entries like below:
Cloning an Oracle E-Business Suite (EBS) environment is a routine task for DBAs, but sometimes even a successful preclone can lead to unexpected failures during the dbTechStack configuration phase.
Toady we are facing JDK version mismatch, which results in the failure of:
perl adcfgclone.pl dbTechStack
In this blog, we will walk through a real-world issue, analyze the error, identify the root cause, and provide a step-by-step solution to fix the problem and successfully complete the cloning process.
Problem Statement
During execution, the clone fails at 0% with the following error:
RC-00110: Fatal: Error occurred while relinking of ApplyDBTechStack
ERROR: Failed to execute adclone.pl
Error log reveals:
java.lang.UnsupportedClassVersionError:
Unsupported major.minor version 51.0
Analyze Log Files
Navigate to the logs directory:
cd /DBA/8010_JAN26/12.1.0/appsutil/logs
ls -lrt
Check the error log:
cat oraInstall*.err
Key Error:
Unsupported major.minor version 51.0
Verify Current JDK Version on Target
cd /DBA/8010_JAN26/12.1.0/jdk/bin
./java -version
Output:
java version "1.6.0_75"
Compare with Source / Working Environment
./java -version
Output:
java version "1.7.0_351"
Root Cause
The source production system was running on JDK 1.7, while the cloned environment contained JDK 1.6.
This mismatch caused the Java runtime to fail with:
Unsupported major.minor version 51.0
here is the logfile with the complete error:
Exception java.lang.UnsupportedClassVersionError: oracle/sysman/ccr/collector/install/InvalidValueException : Unsupported major.minor version 51.0 occurred.. java.lang.UnsupportedClassVersionError: oracle/sysman/ccr/collector/install/InvalidValueException : Unsupported major.minor version 51.0 at java.lang.ClassLoader.defineClass1(Native Method) at java.lang.ClassLoader.defineClassCond(ClassLoader.java:637) at java.lang.ClassLoader.defineClass(ClassLoader.java:621) at java.security.SecureClassLoader.defineClass(SecureClassLoader.java:141) at java.net.URLClassLoader.defineClass(URLClassLoader.java:283) at java.net.URLClassLoader.access$000(URLClassLoader.java:58) at java.net.URLClassLoader$1.run(URLClassLoader.java:197) at java.security.AccessController.doPrivileged(Native Method) at java.net.URLClassLoader.findClass(URLClassLoader.java:190) at java.lang.ClassLoader.loadClass(ClassLoader.java:306) at sun.misc.Launcher$AppClassLoader.loadClass(Launcher.java:301) at java.lang.ClassLoader.loadClass(ClassLoader.java:247) at oracle.sysman.oii.oiif.oiifw.OiifwOCMInfoWCDE.(OiifwOCMInfoWCDE.java:103) at oracle.sysman.oii.oiic.OiicCloneSession.getIterElements(OiicCloneSession.java:1133) at oracle.sysman.oii.oiic.OiicPullSession.initialize(OiicPullSession.java:1423) at oracle.sysman.oii.oiic.OiicSessionWrapper.initialize(OiicSessionWrapper.java:784) at oracle.sysman.oii.oiic.OiicSessionWrapper.initialize(OiicSessionWrapper.java:768) at oracle.sysman.oii.oiic.OiicInstaller.run(OiicInstaller.java:568) at oracle.sysman.oii.oiic.OiicInstaller.runInstaller(OiicInstaller.java:969) at oracle.sysman.oii.oiic.OiicInstaller.main(OiicInstaller.java:906)
Classes compiled with Java 7 cannot run on Java 6.
Solution: Replace JDK with Correct Version
Backup Existing JDK
cd /DBA/8010_JAN26/12.1.0
mv jdk XX_jdk_16075
Copy Correct JDK from Source
cp -RH jdk /DBA/8010_JAN26/12.1.0/
Set Proper Ownership
chown -R ora8010:dba /DBA/8010_JAN26/12.1.0/jdk
Verify Updated JDK
cd /DBA/8010_JAN26/12.1.0/jdk/bin
./java -version
Expected Output:
java version "1.7.0_351"
Re-run Clone:
perl adcfgclone.pl dbTechStack
Final Outcome
After applying the fix:
ApplyDBTechStack completes successfully
No more Java version errors
Conclusion
JDK version mismatch is a subtle but critical issue that can break the Oracle EBS cloning process, even when everything else seems correct.
By carefully analyzing logs and ensuring Java version consistency, you can quickly resolve errors like:
Unsupported major.minor version 51.0
This approach not only fixes the issue but also helps build a more reliable and repeatable cloning process for future deployments.
As an Oracle EBS administrator, you may often find yourself in situations where you do not have direct SQL*Plus or SSH access to the database tier — especially in restricted production environments, cloud setups, or when working as an Apps DBA focused on the application tier.
The good news is that Oracle Applications Manager (OAM) in EBS 12.2 provides powerful built-in tools to perform essential database health checks directly from the application tier. This allows you to quickly verify instance status, tablespace usage, system alerts, and critical services like the Workflow Notification Mailer.
In this step-by-step guide, we’ll cover the most important basic health checks.
1. Log in to Oracle Applications Manager (OAM)
Log in tou your EBS 12.2 instance as a user with System Administrator or Applications Manager responsibility ( e.g., SYSADMIN )
Navigate to System Administrator > Oracle Applications Manager > Applications Dashboard.
This is your central hub for monitoring the entire EBS environment.
From the left navigation menu, you can directly access:
Drom the left navigation menu, you can directly access:
Database Status
Workflow
System Alerts
Concurrent Managers, etc.
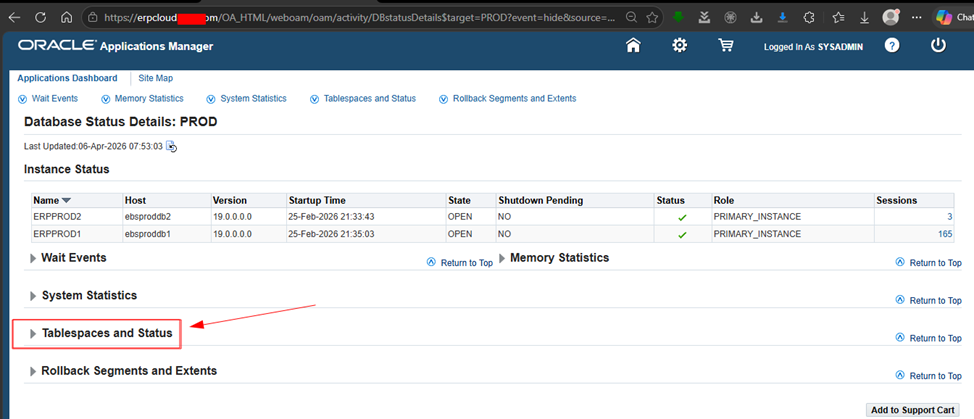
2. Check Database Instance Status
Navigate to Database Status under the left menu ( or via Applications Dashboard > Site Map > Database Status ).
Key things to verify:
Instance Status: Should show Open with a green checkmark for PRIMARY_INSTANCE.
Startup Time: Note when the instance was last started.
Sessions: Active sessions ( high numbers may indicate load ).
Host and versions: Confirm you are on the expected database version ( e.g, 19.0.0.0 ).
In the example above:
Two RAC instances ( ERPPROD1 and ERPPROD2 ) are OPEN.
No shutdown is pending.
One instance has 165 sessions.
3. Check Tablespaces and Free Space (Critical for Database Health)
This is one of the most important checks when you can’t query DBA_TABLESPACES directly.
This is one of the most important checks when you can’t query DBA_TABLESPACES directly.
From the Database Status Details page, expand Tablaspaces and status.
What to look for:
%Free column: Ideally > 15-20% free space for most tablespaces.
Watchout for low free space in critical tablespaces like SYSTEM, SYSAUX, APPS_TS_TX_DATA, undo tablespaces, and temp tablespaces.
USED MB vs FREE MB.
In the provided view:
Most tablespaces show healthy free space ( e.g, APPS_TS_TX_DATA at 91% free ).
Pay special attention to any tablespace below 10% free.
Tip: If any tablespace is critically low, raise a ticket with the DB team immediately or request tablespace resize/ add datafile.
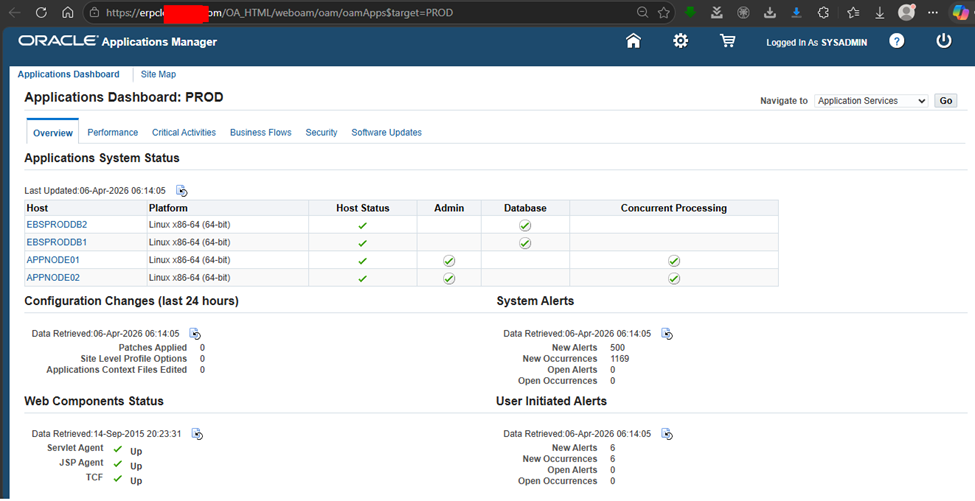
4. Check Overall Applications System Status
Go back to the Applications Dashboard (Overview tab).
Go back to the Applications Dashboard ( Overview tab ).
here you can see:
Host status for all application nodes.
Database status ( green checks = healthy )
Concurrent Processing status
Recent configuration changes
System Alerts and User Initiated Alerts
In a healthy system, you should see green checkmarks across the board.
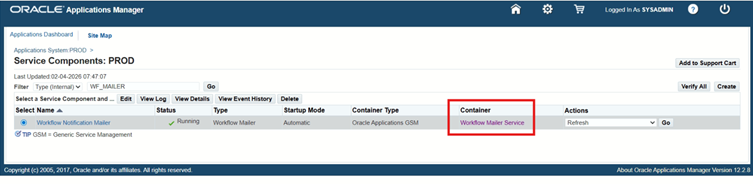
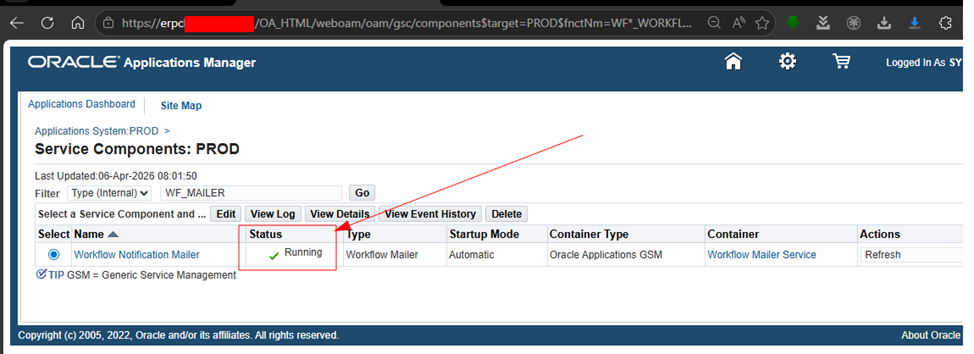
5. Check Workflow Notification Mailer Status (Very Important!)
Many “system errors” in the worklist are related to Workflow. Notifications not reaching users is a common production issue.
Navigate to: Workflow Administrator > Oracle Applications Manager > Workflow Manager > Service Components
or directly from the component search.
Verify:
Workflow Notification Mailer status = running ( green check ).
Type: Workflow Mailer.
Container: Oracle Applications GSM.
If the mailer is Down or Error, notifications will queue up and users won’t receive approval emails.
6. Additional Quick Checks from OAM
System Alerts: Review any new critical alerts.
Concurrent Request: Check for long-running or errored requests.
Patching and critical activities: ensure no pending patches or maintenance are blocking normal operaitions.
Worklist: Clear or investigate recurring “System Error” notifications ( often related to invalid approvers or workflow issues ).
Conclusion
You don’t always need direct database access to perform basic but essential health checks on your Oracle E-Business Suite 12.2 environment. Oracle Applications Manager gives you excellent visibility into database instance status, tablespace usage, overall system health, and Workflow services directly from the application tier.
While performing a database tier clone in Oracle E-Business Suite 12.2 on Linux 8.10, you may encounter a failure during the execution of:
perl adcfgclone.pl dbTechStack
The error that i am getting today is:
Unable to locate ‘g++’ utility in path
This issue occurs due to missing OS-level dependencies required for relinking binaries during the clone process.
In this blog, we will walk through a step-by-step solution to resolve this error quickly and efficiently.
Issue
During the execution of the DB TechStack clone, the system performs prerequisite checks for required utilities like gcc, g++, make, etc.
Even though some utilities are present, the process fails specifically due to missing g++.
Error Output
Checking for make… found – /usr/bin/make Checking for ld… found – /usr/bin/ld Checking for gcc… found – /usr/bin/gcc Checking for g++… Unable to locate ‘g++’ utility in path
Verification confirms that g++ is not installed: which g++ /usr/bin/which: no g++ in PATH
Solution
To resolve the issue, install the required package using yum.
Install gcc-c++
yum install gcc-c++.x86_64
This command installs:
gcc-c++
Required dependencies (cpp, gcc, libgomp, etc.)
Verify Installation
After installation, confirm that g++ is available:
which g++
Expected output:
/usr/bin/g++
Re-run Clone
Now execute the clone command again:
perl adcfgclone.pl dbTechStack
This time, the process should proceed successfully:
Running: Context clone…
Conclusion
The “Unable to locate g++ utility in path” error is a straightforward but blocking issue during Oracle EBS DB Tier cloning.
By simply installing the gcc-c++ package, you can resolve the problem and continue your cloning activity without further interruptions.


 Visit Today : 59
 Visit Yesterday : 42
 This Month : 1108
 This Year : 6212
 Total Visit : 13608
 Hits Today : 69
 Total Hits : 17401
 Who's Online : 1